So it’s sunny and you would probably rather go get some ice cream than noodle around in the settings for Teams, but Microsoft gives teachers some important controls in Teams that can affect discourse and interactions in your class. Read on to find out what you can control and what you can’t (or go get that ice cream, we’ll still be here when you come back.)
How to Get to Settings
When you’ve opened Teams, you can quickly get to the settings panel for any team by clicking on the three dots next to a team name in left rail. This will open a context menu with a bunch of options. I know you’ll want to click on each of them just to watch the world burn, but for this article click on the item with the gear labeled Manage Team.
Boom! You’re in the team’s settings panel now. Let’s take a look around.
Members
So this panel is basically what it sounds like. Don’t forget that in the Teams EDU universe there are Owners (probably you) and Members (probably your students.)
This panel breaks team members into these groups Owners and Members and Guests. By default the Members and guests section is collapsed and you can’t see who is on it. No fear, all you have to do is click the carrot next to where it says Members and Guests and this will expand the section and show you the members.
Once expanded you have a couple of options. Toward the right is a toggle to mute students. All you have to do is find the student who won’t stop posting GIFs and mute her by clicking in the box under Mute Students (or mute them all by clicking the top box.) This will prevent the student from replying to conversations.
The other option is to change their role (all the way to the right under the column called Role. You won’t want to mess with this unless a student accidentally ended up as an owner (or is going to take over teaching your class.)
Pending Requests
We’re going to skip this one for now. Trust me you won’t spending any time here.
Settings
This where the action really happens. There are seven sections that expand with granular options for you to fiddle with. I’m going to skip talking about Guest Permissions and OneNote Class Notebook. Again, going to ask you to trust me on this one.
Team Theme
Opening this section will you the option to Pick or Change theme. What does this mean you ask? Well not too much actually, but it’s pretty cool. Changing theme will change the square icon that shows up next to the team name in the left rail and at the top of channel tabs. This is pretty cool but the problem is the icons are kind of generic. So, here’s a pro tip, do yourself a favor, download the Teams app on your phone. When you got it open on your phone, click on the three dots next to a team name and then Edit team. This will give you the option to Change Picture. Instead of showing you a palate of Microsoft made pics, you can upload whatever pictures are on your phone. You can thank me later.
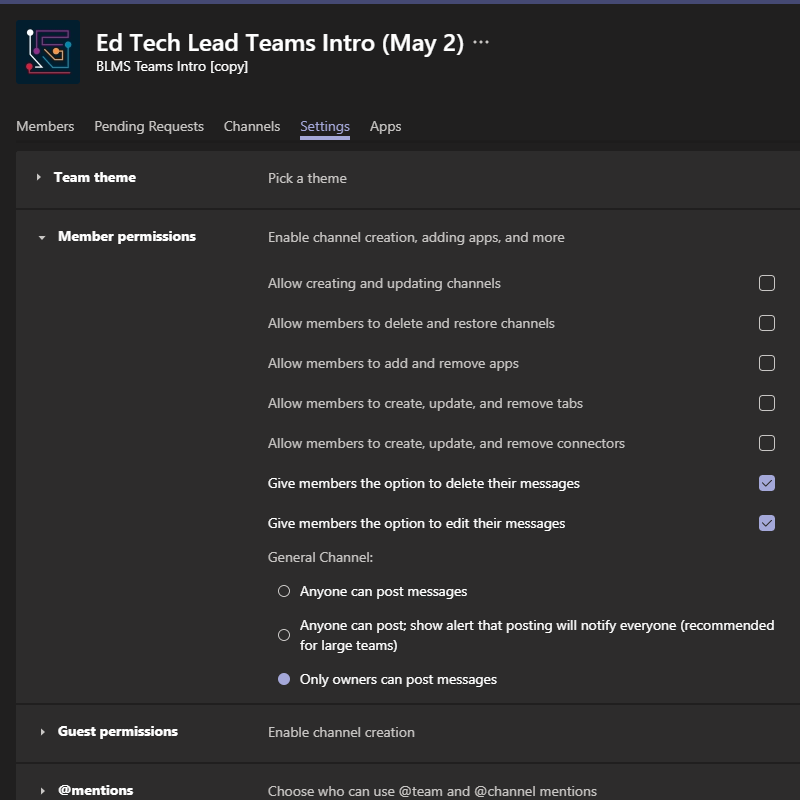
Member Permissions
 Okay now for the important stuff. This section opens up and gives you a number of options. They are all self-explanatory, but by default in a Class Team, only the following options are toggled on:
- Give members the option to delete their messages
- Give members the option to edit their messages
- Anyone can post messages
Let’s start with anyone can post messages. This setting applies only to the general channel and I would recommend turning that off by choosing Only owners can post messages. This will let you have one channel where communication is mostly one way and make a great place to make announcements, etc. You can leave it on if you want though.
So, in every other channel, members (students) can post a new message and reply to a message already posted. That’s what the other two permissions that are toggled on are referring to. It’s your call if you want to allow students to revise their contributions in the conversation areas or not, but by default they will have that option.
What else is in here. Well, if you want, you can turn on the ability for students to create and update channels, delete channels and add tabs. There aren’t too many benefits to allowing students to do these things but depending on how comfortable you are with your students responsibility or your educational philosophy, this is where you would enable those options if that’s your bag.
@mentions
This sections let’s you decide whether or not students can @ the team name and send a notification to everyone on the team. By default these are on (and are great for team members using the app.) Again, choose wisely, but this is one that is mostly about your style and tolerance for a potential deluge of notifications.
Team code
Opening this section allows to generate and post a code that students can use to easily join the team. It’s kind of fun and even has an easy feature that will let post the code in big bold letters, full screen. It’s pretty well done, I’m not going to lie.
Fun stuff
 This section let’s you make choices about how lame you want to be. Just kidding. You’re not lame (that I know of.) What this section does give you is the ability to control the use of emoji, memes, GIFs or stickers in the team.
Yes, you can open the wonderful world of Giphy to your students. However if you do so, a filter is toggled on and is automatically set to Strict.
Anyway, lots of fun to be had here and it also gives you a some leverage.
